SSR 없이 React에서 OG/SEO 처리하기
최근 React로 개인적으로 프로젝트를 진행해보고 있다. React는 주로 코드를 정적 리소스들로 빌드하여, 이 리스소들을 Client Side 에서 렌더링 한다.
여기서 발생된 문제는 정적 리소스 상태에서는 api를 통한 데이터도 받아오지 않은 상태라는 것이다. 그렇기 때문에 단순히 html만 받아와서는 해당 페이지에 어떤 내용이 올지 알지 못한다.
그래서 카카오톡이나 각종 Social Media 에서 링크에 대한 메타정보를 가져올 때 실패하였다. 2026년에는 될 줄 알았는데 안되는것이 충격적이긴 했다. 뭔가 수집하는쪽에서 렌더링을 한 후 가져오거나 하지는 않았었다.
아무튼 그래서 어떻게 해결해야 하나 좀 찾아보았다.
해결방법 고민
첫번째로는 SSR 을 사용할 수 있다. 앞서 이야기 한 대로 React의 전통적인 방식은 SSR을 사용하지 않는다. 이를 보완하기 위해 Next.js 같은 프레임워크가 SSR(서버 사이드 렌더링)을 주도해 왔고, 최근에는 React에서 서버 컴포넌트(RSC)라는 기능을 엔진 자체에 도입하면서, 프레임워크와 밀접하게 결합된 표준화된 서버 렌더링 환경을 제공하게 되었다고 한다.
하지만 이 방법은 사용하고 싶지 않았다. SSR을 사용하면 FE를 위해서도 서버를 띄워줘야 했기 때문이다. 나는 FE 영역을 가능하면 Client Side에서 해결하고 싶었기 때문에, 이 방법은 채택하지 않았다.
다음으로 Prerender.io 와 같은 솔루션을 사용하는 방법이 있었다. 추가적인 비용을 내고 싶지 않았기 때문에 마찬가지로 사용하지 않았다. 아직 그 정도 사이즈의 트래픽이 있는 것도 아니었다.
그 결과 다음과 같은 컨셉을 구상하여 도입하였다. be 에서 컨텐츠의 변동이 발생했을 경우, 해당 컨텐츠를 기반으로 og 처리를 위한 html을 생성한다. nginx 에서는 요청한 주체가 bot 일 경우, 해당 요청을 react 로 보내는게 아니라, og 처리를 위해 생성된 html로 보낸다. 그러면 bot은 og 정보를 읽어갈 수 있다.
구현 및 설정
방향성은 정하였기 때문에, Code Assistant 를 통해 빠르게 구현하였다.
구현된 실제 코드는 다음과 같다.
BE
Spring 에서 다음과 같이 기능을 만들었다. 내용들은 본인의 내용에 맞게 수정하면 된다. generateOgHtml 를 게시글이 생성/수정 되었을 때 처리해주면 된다.
/**
  * 특정 게시글에 대한 OG HTML 수동 생성
  */
@Async("ogHtmlTaskExecutor")
public void generateOgHtml(Post post) {
    try {
        log.info("Starting OG HTML generation for post id: {}", post.getId());

        String html = buildOgHtml(post);
        Path outputPath = getOutputPath(post.getId());

        Files.createDirectories(outputPath.getParent());
        Files.writeString(outputPath, html, StandardCharsets.UTF_8);

        log.info("OG HTML generated successfully for post id: {} at {}", post.getId(), outputPath);
    } catch (IOException e) {
        log.error("Failed to generate OG HTML for post id: {}", post.getId(), e);
    }
}
private String buildOgHtml(Post post) {
    String title = escapeHtml(post.getTitle());
    String description = extractDescription(post.getContent());
    String image = extractFirstImage(post.getContent());
    String url = ogHtmlProperties.getBaseUrl() + "/channel/" + post.getChannel().getId() + "/post/" + post.getId();

    return """
        <!DOCTYPE html>
        <html lang="ko">
        <head>
            <meta charset="UTF-8">
            <meta name="viewport" content="width=device-width, initial-scale=1.0">

            <title>%s | %s</title>
            <meta name="title" content="%s">
            <meta name="description" content="%s">

            <meta property="og:type" content="article">
            <meta property="og:url" content="%s">
            <meta property="og:title" content="%s">
            <meta property="og:description" content="%s">
            <meta property="og:image" content="%s">
            <meta property="og:site_name" content="%s">
            <meta property="og:locale" content="ko_KR">

            <meta property="twitter:card" content="summary_large_image">
            <meta property="twitter:url" content="%s">
            <meta property="twitter:title" content="%s">
            <meta property="twitter:description" content="%s">
            <meta property="twitter:image" content="%s">

            <meta http-equiv="refresh" content="0; url=%s">
        </head>
        <body>
            <h1>%s</h1>
            <p>%s</p>
            <p><a href="%s">%s</a></p>
        </body>
        </html>
        """.formatted(
            title, ogHtmlProperties.getSiteName(),
            title,
            description,
            url,
            title,
            description,
            image,
            ogHtmlProperties.getSiteName(),
            url,
            title,
            description,
            image,
            url,
            title,
            description,
            url, url
        );
}
compose.yml
아래와 같은 식으로 생성된 og-html 에 대한 volume 설정을 추가해주었다. nginx 에서 접근 가능하도록 컨테이너 외부의 공간과 연결시켜준다.
spring-server:
  image: spring-server:latest
  container_name: spring-server
  ports:
    - "8080:8080"
  environment:
    - ...
  restart: "unless-stopped"
  volumes:
    - ./og-html:/app/og-html:U
nginx
/channel/{channelId}/post/{postId} 형태로 요청이 들어왔을 경우 봇인지 체크한 후, 봇일경우에는 BE 에서 생성한 정적 html 파일과 연결되도록 한다.
location /internal-og/ {
    internal;
    alias /var/www/html/og-html/posts/; # 마지막에 / 필수
}

location ~ ^/channel/([0-9]+)/post/([0-9]+)$ {
    set $channel_id $1;
    set $post_id $2;
    set $is_bot 0;

    # 1. 봇 체크 (카카오톡, 페이스북, 트위터 등)
    if ($http_user_agent ~* "facebookexternalhit|twitterbot|kakaotalk-scrap|slackbot|googlebot|bingbot|linkedinbot") {
        set $is_bot 1;
    }

    # 봇인 경우 정적 OG HTML 서빙
    if ($is_bot = 1) {
        rewrite ^/channel/[0-9]+/post/([0-9]+)$ /internal-og/$1.html last;
    }

    # 일반 유저는 React(Vite) 앱으로 프록시
    proxy_pass http://localhost:5173;
    proxy_set_header Host $host;
    proxy_set_header X-Real-IP $remote_addr;
    proxy_set_header X-Forwarded-For $proxy_add_x_forwarded_for;
    proxy_set_header X-Forwarded-Proto $scheme;
}
결과
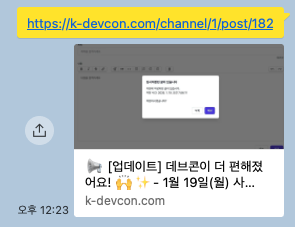
카카오톡에서 링크를 올리면 다음과 같이 잘 나오게 된 것을 볼 수 있다.
마무리
SSR이나 별도 프레임워크를 도입하지 않고도, 상황에 맞게 문제를 분리해서 해결할 수 있다는 점에서 나름 의미 있는 선택이었다. 모든 경우에 정답은 아니지만, 비슷한 고민을 하는 사람에게 하나의 참고 사례가 되었으면 한다.