Amazon EKS로 웹 애플리케이션 구축하기
AWS Community day 2023 행사에 참여해서 진행했던 핸즈온랩의 경험을 정리하는 글입니다.
오프닝 소개
핸즈온은 어떻게 할 수 있나요?
혼자서 핸즈온을 하기 어려운 이유
- 요금 걱정
- 막히면 물어볼 곳이 마땅치 않음
- 동기부여
AWS Skill Builder
- Builder’s Lab : 24/7 무제한 실습 제공
- 월 25불
Amazon EKS로 웹 애플리케이션 구축하기
Amazon EKS로 웹 애플리케이션 구축하기
이 날 진행한 핸즈온랩은 워크샵에 공개되어 있다.
유튜브 영상으로도 제공된다.
Table of contents
- about track2 (진행 일정)
- about K8s
- about aws eks
- hands-on lab and guidance
핸즈온에서 다루는 도구
- AWS EKS
- AWS Fargate
- EKS Container Insights
- …
컨테이너
- 가상화 방식의 한 종류로 프로세스를 격리하여 구현
- OS, WAS, CODE, ENV등 종속성 레이어 구조
- 어느 환경에서나 동일한 결과 수행
- 어느 환경에서나 라고는 하지만 OS, CPU 아키텍처에 조금 다를 수 있긴 함.
- 간편하고 간소화 되어 대규모 환경이 용이해짐
K8s
- 컨테이너 워크로드와 서비스를 관리하기 위한 이식성이 있고, 확장가능한 오픈소스 플랫폼
- 구글이 2014년에 쿠버네티스 프로젝트를 오픈소스화 (Borg)
- 키잡이(helmsman)나 파일럿을 뜻하는 그리스어에서 유래.
- K8s라는 표기는 “K”와 “s”와 그 사이에 있는 8글자를 나타내는 약식 표기이다.
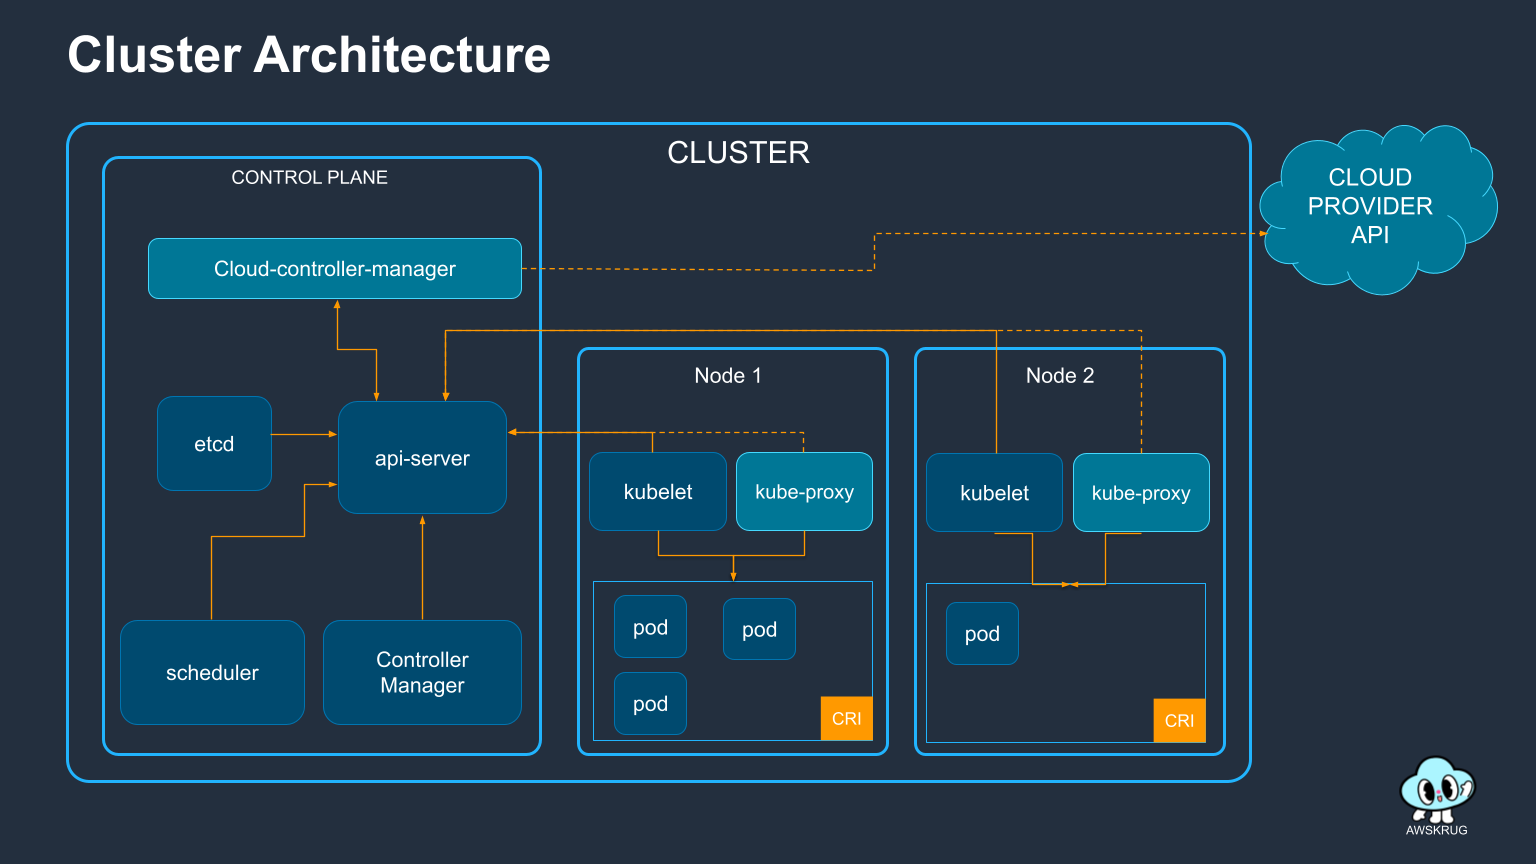
K8s Cluster Architecture
실습 환경
실습 환경은 로컬에서 진행하는 것이 아닌 AWS Cloud9 이라는 클라우드 IDE에서 구축하여 진행하였다. AWS 에서는 Cloud9에 대해 다음과 같이 소개하고 있다.
브라우저만으로 코드를 작성, 실행 및 디버깅할 수 있는 클라우드 기반 IDE
핸즈온 랩에서는 미리 어느정도 실행환경 구축은 되어 있었고 실습만 진행하면 되도록 구성해주었다. (권한 설정 같은 것들도 거의 다 이미 되어 있는 상태였음.)
EKS
Amazon Elastic Kubernetes Service(Amazon EKS)는 AWS 클라우드와 온프레미스 데이터 센터에서 Kubernetes를 실행하는 데 사용되는 관리형 Kubernetes 서비스입니다.
EKS 특징
- VPC 연계로 AWS 리소스와 심리스한 연결
- IAM 를 통한 역할 기반 엑세스 제어(RBAC)
- EKSCTL을 통한 AWS와 K8s의 연동
- Container Insights를 이용한 가시화
ECR
Amazon Elastic Container Registry(ECR)는 어디에서나 컨테이너 이미지를 손쉽게 저장, 공유 및 배포할 수 있는 완전관리형 Docker 컨테이너 레지스트리 입니다.
컨테이너 이미지를 리포지토리에 푸쉬하기 위해, 인증 토큰을 가지고 오고, 해당 인증 도큰을 docker login 명령어로 전달합니다. 이 때, 사용자 이름 값은 AWS로 명시하고, 인증하려는 Amazon ECR 레지스트리 URI를 지정합니다.
aws ecr get-login-password --region ${AWS_REGION} | docker login --username AWS --password-stdin $ACCOUNT_ID.dkr.ecr.$AWS_REGION.amazonaws.com
EKS 클러스터 생성하기
핸즈온에서는 다음과 같이 소개하고 있다.
Amazon EKS 클러스터는 다양한 방식으로 배포될 수 있습니다.
- AWS 콘솔 창 에서 클릭으로 배포하는 방법
- AWS CloudFormation 혹은 AWS CDK 와 같은 IaC(Infrastructure as Code) 도구를 사용해 배포하는 방법
- EKS의 공식 CLI인 eksctl 로 배포하는 방법
- Terraform, Pulumi, Rancher 등으로 배포하는 방법
그리고 eksctl 를 통해서 배포하는 방법에 대해서 설명을 한다.
eks-demo-cluster.yaml 를 아래와 같이 cat 명령어를 통해 생성한다.
cat << EOF > eks-demo-cluster.yaml
---
apiVersion: eksctl.io/v1alpha5
kind: ClusterConfig

metadata:
  name: eks-demo # 생성할 EKS 클러스터명
  region: ${AWS_REGION} # 클러스터를 생성할 리전
  version: "1.27"

vpc:
  cidr: "10.0.0.0/16" # 클러스터에서 사용할 VPC의 CIDR
  nat:
    gateway: HighlyAvailable

managedNodeGroups:
  - name: node-group # 클러스터의 노드 그룹명
    instanceType: m5.large # 클러스터 워커 노드의 인스턴스 타입
    desiredCapacity: 3 # 클러스터 워커 노드의 갯수
    volumeSize: 20  # 클러스터 워커 노드의 EBS 용량 (단위: GiB)
    privateNetworking: true
    iam:
      withAddonPolicies:
        imageBuilder: true # Amazon ECR에 대한 권한 추가
        albIngress: true  # albIngress에 대한 권한 추가
        cloudWatch: true # cloudWatch에 대한 권한 추가
        autoScaler: true # auto scaling에 대한 권한 추가
        ebs: true # EBS CSI Driver에 대한 권한 추가

cloudWatch:
  clusterLogging:
    enableTypes: ["*"]

iam:
  withOIDC: true
EOF
그리고 eksctl을 통해 클러스터를 배포한다.
eksctl create cluster -f eks-demo-cluster.yaml
클러스터를 생성하는데는 약 10-20분 정도 소요되었다.
클러스터의 배포 진행 단계는 CloudFormation 에서 진행단계를 볼 수 있다.
AWS Load Balancer 컨트롤러 만들기
Amazon EKS의 Application Load Balancing 이란 클러스터에 인그레스 자원이 생성될 때에 ALB(Application Load Balancer) 및 필요한 자원이 생성되도록 트리거하는 컨트롤러입니다. 인그레스 자원들은 ALB를 구성하여 HTTP 또는 HTTPS 트래픽을 클러스터 내 파드로 라우팅합니다.
쿠버네티스의 Ingress의 경우, Application Load Balancers으로 프로비저닝됩니다.
쿠버네티스의 Service의 경우, Network Load Balancers으로 프로비저닝됩니다.
Ingress는 쿠버네티스 클러스터 내부에서 내부 서비스나 마이크로서비스에 대한 외부 접근을 관리하는 리소스
Service는 쿠버네티스 클러스터 내부에서 실행 중인 파드(Pod) 집합에 대한 네트워크 엔드포인트를 노출하는 데 사용
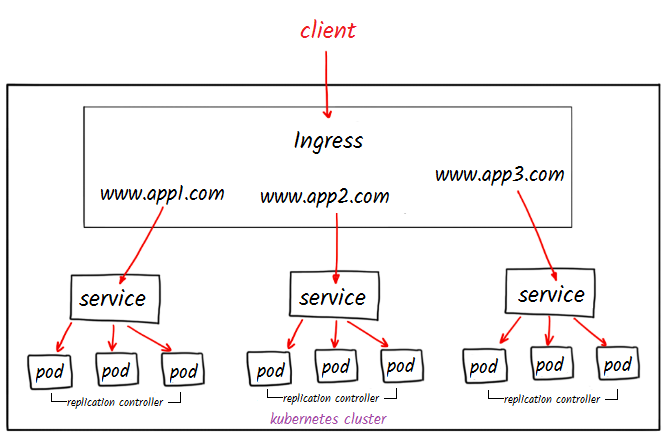 출처 : middlewareinventory
Service의 경우 URL Path에 따른 서비스간 라우팅이 불가능 하다. 반면에 Ingress는 URL Path에 따라 라우팅하게 할 수 있다.
- AWS Load Balancer 컨트롤러를 배포하기 전, 클러스터에 대한 IAM OIDC(OpenID Connect) 자격 증명 공급자를 생성합니다. 쿠버네티스가 직접 관리하는 사용자 계정을 의미하는 서비스 계정 에 IAM 역할을 사용하기 위해, 생성한 클러스터(현재 활동에서 eks-demo)에 IAM OIDC 공급자 가 존재해야 합니다.
eksctl utils associate-iam-oidc-provider \
     --region ${AWS_REGION} \
     --cluster eks-demo \
     --approve
수행하면 아래와 같이 나온다.
2023-11-04 06:02:30 [ℹ]  will create IAM Open ID Connect provider for cluster "eks-demo" in "ap-northeast-2"
2023-11-04 06:02:30 [✔]  created IAM Open ID Connect provider for cluster "eks-demo" in "ap-northeast-2"
클러스터에 컨트롤러 추가하기
- AWS Load Balancer controller를 클러스터에 추가하는 작업을 수행합니다. 먼저, 인증서 구성을 웹훅에 삽입할 수 있도록 cert-manager 를 설치합니다
kubectl apply -f https://github.com/cert-manager/cert-manager/releases/download/v1.12.0/cert-manager.yaml
cert-manager cert-manager는 인증서 및 인증서 발급자를 Kubernetes 클러스터의 리소스 유형으로 추가하고 해당 인증서를 획득, 갱신 및 사용하는 프로세스를 단순화합니다. cert-manager는 Kubernetes 클러스터 내에서 동작하며, 여러 리소스 간의 통신과 협력을 통해 SSL/TLS 인증서를 관리합니다.
- Load balancer controller yaml 파일을 다운로드 합니다. 그리고 sed 명령어를 통해 위에서 생성한 service account로 덮어쓰기 해줍니다. 이후 수정된 yaml 파일을 기반으로 AWS 로드 밸런서 컨트롤러를 배포합니다.
curl -Lo v2_5_4_full.yaml https://github.com/kubernetes-sigs/aws-load-balancer-controller/releases/download/v2.5.4/v2_5_4_full.yaml

sed -i.bak -e '596,604d' ./v2_5_4_full.yaml
sed -i.bak -e 's|your-cluster-name|eks-demo|' ./v2_5_4_full.yaml

kubectl apply -f v2_5_4_full.yaml
sed 명령어 sed(stream editor)는 유닉스에서 텍스트를 분해하거나 변환하기 위한 프로그램이다.
출처 : 위키피디아
596,604d: 596번 라인부터 604번 라인까지의 내용을 삭제하라는 명령s|your-cluster-name|eks-demo|: your-cluster-name를 eks-demo로 치환하라는 뜻
- IngressClass yaml을 다운로드 하여 클러스터에 Ingress 클래스를 배포합니다.
curl -Lo v2_5_4_ingclass.yaml https://github.com/kubernetes-sigs/aws-load-balancer-controller/releases/download/v2.5.4/v2_5_4_ingclass.yaml
kubectl apply -f v2_5_4_ingclass.yaml
kubectl apply 명령어는 파일에 정의된 리소스가 이미 존재하면 업데이트하고, 없으면 새로 생성함.
- 배포가 성공적으로 되고 컨트롤러가 실행되는지 아래의 명령어를 통해 확인합니다. 결과 값이 도출되면 정상임을 의미합니다.
kubectl get deployment -n kube-system aws-load-balancer-controller
아래의 명령어를 통해, service account가 생성된 것을 확인할 수 있습니다.
kubectl get sa aws-load-balancer-controller -n kube-system -o yaml
서비스 배포하기
서비스 배포를 위해 manifests 라는 폴더를 만들어 yaml 파일들을 관리합니다.
각 서비스마다 세가지 매니페스트를 사용한다. 각각에 대해서 간단하게 설명하자면 다음과 같다.
- deploy manifest : 애플리케이션을 클러스터에 배포하는 데 사용
- service manifest : 네트워크를 통해 Pod에 접근 가능한 서비스를 만드는데 사용
- ingress manifest : 클러스터 외부에서 내부 서비스에 접근할 수 있게 해주는 인그레스 컨트롤러를 정의하는데 사용
총 세가지 서비스를 배포한다.
- python flask 기반 백엔드 서비스
- nodejs 기반 백엔드 서비스
- react 기반 프론트 서비스
첫번째 백엔드 배포하기
cd ~/environment/manifests/
cat <<EOF> flask-deployment.yaml
---
apiVersion: apps/v1
kind: Deployment
metadata:
  name: demo-flask-backend
  namespace: default
spec:
  replicas: 3
  selector:
    matchLabels:
      app: demo-flask-backend
  template:
    metadata:
      labels:
        app: demo-flask-backend
    spec:
      containers:
        - name: demo-flask-backend
          image: $ACCOUNT_ID.dkr.ecr.$AWS_REGION.amazonaws.com/demo-flask-backend:latest
          imagePullPolicy: Always
          ports:
            - containerPort: 8080
EOF
cat <<EOF> flask-service.yaml
---
apiVersion: v1
kind: Service
metadata:
  name: demo-flask-backend
  annotations:
    alb.ingress.kubernetes.io/healthcheck-path: "/contents/aws"
spec:
  selector:
    app: demo-flask-backend
  type: NodePort
  ports:
    - port: 8080 # 서비스가 생성할 포트
      targetPort: 8080 # 서비스가 접근할 pod의 포트
      protocol: TCP
EOF
cat <<EOF> flask-ingress.yaml
---
apiVersion: networking.k8s.io/v1
kind: Ingress
metadata:
    name: "flask-backend-ingress"
    namespace: default
    annotations:
      alb.ingress.kubernetes.io/scheme: internet-facing
      alb.ingress.kubernetes.io/target-type: ip
      alb.ingress.kubernetes.io/group.name: eks-demo-group
      alb.ingress.kubernetes.io/group.order: '1'
spec:
    ingressClassName: alb
    rules:
    - http:
        paths:
          - path: /contents
            pathType: Prefix
            backend:
              service:
                name: "demo-flask-backend"
                port:
                  number: 8080
EOF
kubectl apply -f flask-deployment.yaml
kubectl apply -f flask-service.yaml
kubectl apply -f flask-ingress.yaml
두번째 백엔드 배포하기
cd ~/environment/manifests/
cat <<EOF> nodejs-deployment.yaml
---
apiVersion: apps/v1
kind: Deployment
metadata:
  name: demo-nodejs-backend
  namespace: default
spec:
  replicas: 3
  selector:
    matchLabels:
      app: demo-nodejs-backend
  template:
    metadata:
      labels:
        app: demo-nodejs-backend
    spec:
      containers:
        - name: demo-nodejs-backend
          image: public.ecr.aws/y7c9e1d2/joozero-repo:latest
          imagePullPolicy: Always
          ports:
            - containerPort: 3000
EOF
cat <<EOF> nodejs-service.yaml
---
apiVersion: v1
kind: Service
metadata:
  name: demo-nodejs-backend
  annotations:
    alb.ingress.kubernetes.io/healthcheck-path: "/services/all"
spec:
  selector:
    app: demo-nodejs-backend
  type: NodePort
  ports:
    - port: 8080
      targetPort: 3000
      protocol: TCP
EOF
cat <<EOF> nodejs-ingress.yaml
---
apiVersion: networking.k8s.io/v1
kind: Ingress
metadata:
  name: "nodejs-backend-ingress"
  namespace: default
  annotations:
    alb.ingress.kubernetes.io/scheme: internet-facing
    alb.ingress.kubernetes.io/target-type: ip
    alb.ingress.kubernetes.io/group.name: eks-demo-group
    alb.ingress.kubernetes.io/group.order: '2'
spec:
  ingressClassName: alb
  rules:
  - http:
        paths:
          - path: /services
            pathType: Prefix
            backend:
              service:
                name: "demo-nodejs-backend"
                port:
                  number: 8080
EOF
kubectl apply -f nodejs-deployment.yaml
kubectl apply -f nodejs-service.yaml
kubectl apply -f nodejs-ingress.yaml
프론트엔드 배포하기
워크샵에서는 프론트엔드의 경우 직접 컨테이너까지 ECR 까지 올려서 진행하나. 이 글에서는 그 부분은 생략한다.
cd ~/environment/manifests/
cat <<EOF> frontend-deployment.yaml
---
apiVersion: apps/v1
kind: Deployment
metadata:
  name: demo-frontend
  namespace: default
spec:
  replicas: 3
  selector:
    matchLabels:
      app: demo-frontend
  template:
    metadata:
      labels:
        app: demo-frontend
    spec:
      containers:
        - name: demo-frontend
          image: $ACCOUNT_ID.dkr.ecr.$AWS_REGION.amazonaws.com/demo-frontend:latest
          imagePullPolicy: Always
          ports:
            - containerPort: 80
EOF
cat <<EOF> frontend-service.yaml
---
apiVersion: v1
kind: Service
metadata:
  name: demo-frontend
  annotations:
    alb.ingress.kubernetes.io/healthcheck-path: "/"
spec:
  selector:
    app: demo-frontend
  type: NodePort
  ports:
    - protocol: TCP
      port: 80
      targetPort: 80
EOF
cat <<EOF> frontend-ingress.yaml
---
apiVersion: networking.k8s.io/v1
kind: Ingress
metadata:
  name: "frontend-ingress"
  namespace: default
  annotations:
    alb.ingress.kubernetes.io/scheme: internet-facing
    alb.ingress.kubernetes.io/target-type: ip
    alb.ingress.kubernetes.io/group.name: eks-demo-group
    alb.ingress.kubernetes.io/group.order: '3'
spec:
  ingressClassName: alb
  rules:
    - http:
        paths:
          - path: /
            pathType: Prefix
            backend:
              service:
                name: "demo-frontend"
                port:
                  number: 80
EOF
kubectl apply -f frontend-deployment.yaml
kubectl apply -f frontend-service.yaml
kubectl apply -f frontend-ingress.yaml
참고자료
현재 상태
화면 구성
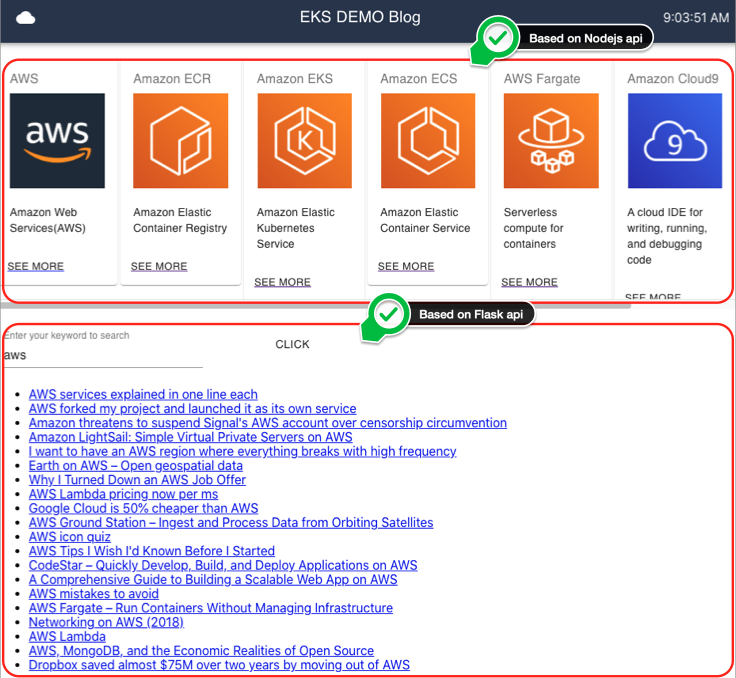
아키텍처

여기서 Node Group이 3개이고, 그 안에 Pod이 자동으로 하나씩 배치되는 것이 신기했는데
Node Group이 3개인 이유는 EKS를 생성할 때 managedNodeGroup의 desiredCapacity를 3으로 지정했기 때문이고, 하나씩 배치되어 있는 이유는 EKS가 Node Group에 Pod을 골고루 배치해주기 때문이였다.
AWS Fargate 사용하기
AWS Fargate에 대한 설명은 다음과 같다.
AWS Fargate는 컨테이너에 적합한 서버리스 컴퓨팅 엔진으로 Amazon Elastic Container Service(ECS) 및 Amazon Elastic Kubernetes Service(EKS) 에서 모두 작동합니다.
AWS Fargate는 서버를 관리할 필요가 없기 때문에 애플리케이션 구축에 집중할 수 있습니다.
AWS Fargate는 사용량에 따라 요금이 부과되는 서버리스 컴퓨팅 엔진으로 서버를 프로비저닝하고 관리할 필요가 없고 애플리케이션별로 리소스를 지정하고 관련 비용을 지불할 수 있으며, 계획적으로 애플리케이션을 격리함으로써 보안 성능을 향상시킬 수 있습니다.
이 핸즈온랩에서는 프론트엔드 서비스를 fargate를 통해 배포하도록 변경한다.
먼저 fargate profile을 프로비저닝한다. 프로비저닝에는 꽤 시간이 소요된다.
cd ~/environment/manifests/
cat <<EOF> eks-demo-fargate-profile.yaml
---
apiVersion: eksctl.io/v1alpha5
kind: ClusterConfig
metadata:
  name: eks-demo
  region: ${AWS_REGION}
fargateProfiles:
  - name: frontend-fargate-profile
    selectors:
      - namespace: default
        labels:
          app: frontend-fargate
EOF
eksctl create fargateprofile -f eks-demo-fargate-profile.yaml
fargate 에 서비스를 배포하기 전에 현재 kubernetes와 연결되어 있는 프론트엔드 pod을 제거한다.
kubectl delete -f frontend-deployment.yaml
기존 pod을 제거했으면 fargate 에 서비스를 배포한다.
cat <<EOF> frontend-deployment.yaml
---
apiVersion: apps/v1
kind: Deployment
metadata:
  name: demo-frontend
  namespace: default
spec:
  replicas: 3
  selector:
    matchLabels:
      app: frontend-fargate
  template:
    metadata:
      labels:
        app: frontend-fargate
    spec:
      containers:
        - name: demo-frontend
          image: $ACCOUNT_ID.dkr.ecr.$AWS_REGION.amazonaws.com/demo-frontend:latest
          imagePullPolicy: Always
          ports:
            - containerPort: 80
EOF
cat <<EOF> frontend-service.yaml
---
apiVersion: v1
kind: Service
metadata:
  name: demo-frontend
  annotations:
    alb.ingress.kubernetes.io/healthcheck-path: "/"
spec:
  selector:
    app: frontend-fargate
  type: NodePort
  ports:
    - protocol: TCP
      port: 80
      targetPort: 80
EOF
이미 ingress에는 등록되어 있기 때문에 다시 수행하지 않아도 된다.
kubectl apply -f frontend-deployment.yaml
kubectl apply -f frontend-service.yaml
접속 주소는 fargate 로 옮기기 전과 동일함.
echo http://$(kubectl get ingress/frontend-ingress -o jsonpath='{.status.loadBalancer.ingress[*].hostname}')
이후 내용들은 실습시 적어놓은 부분들에 대해서 간단하게 정리하였다.
fluent bit 을 통해 로그를 라우팅 할 수 있음. amazon-cloudwatch 와 연동하여 사용함. CloudWatch Logs에 로그를 보내기 위해 fluent bit을 daemonsets 형태로 설치함.
daemonsets은 클러스터의 모든 노드에 특정 파드를 실행하는 리소스 컨트롤러 중 하나. 주로 로깅, 모니터링, 노드 에이전트 등을 각 노드에 배포할 때 사용
쿠버네티스 Metrics Server를 설치하여 쿠버네티스 클러스터 전체의 리소스 사용 데이터를 집계할 수 있음.
siege : HTTP 부하 테스트 도구
HPA : pods을 조정함 Cluster Autoscaler : worker node (pod들의 그룹)을 조정함
kube-ops-view : CLI 기반 쿠버네티스 클러스터의 상태 시각화 도구
Helm : Kubernetes 애플리케이션을 손쉽게 배포 및 관리하기 위한 패키지 관리 도구
helm 과 apply로 설치하는 것의 차이
- helm : 애플리케이션을 구성하고 패키지화한 후, Helm CLI를 사용하여 간단한 명령으로 배포
- apply : Kubernetes 매니페스트 파일을 직접 사용하여 애플리케이션을 배포
이후 github action, argo 같은 CI/CD 도구들과 연동하는 세션을 진행함.
- Trivy - 컨테이너 이미지 취약점 검사
- Checkov : K8s manifest 정적 검사